This article is an expansion/modification of an email I wrote to a friend, in response to a request for a critique on a still life (a fruit arrangement not included here). I
later added these W.I.P pics of a small pastel, which I've used for the
demo. The pics help illustrate the ideas contained in the article. I hope its of some use to whomever is reading this post, even though at times it may read as being addressed to a particular person.
We are often recommended to paint still lives, even though we may not be particularly attracted to that genre. I love painting figures, so I'm not exactly a 'still-life'-ist or a landscape-ist. But I do realize the importance of painting still lives. Here, the idea is not to make picture-perfect,
finished paintings (although you may do that if you wish to), but to teach us about -
- shapes (the outline of
objects),
- how these shapes overlap (objects in front of one another),
- their perspective
- the effect of light on these objects (which gives them volume),
- how to
interpret and then make different mixes of colors.
All
these are tremendously important in
improving our ability to look,
which is the primary skill one needs to develop in order to improve drawing, painting, coloring and value skills - all of which undoubtedly affect the quality of our regular work (be it 'abstract' or 'realistic').
Now, a couple more points I would like to make about the still life (this particular one which I have critiqued was a basket of fruits):
1)
Simple light arrangement - You've chosen a rather complex, multi-directional
lighting for this (I can see at least two shadows on the ground). Its
best to have
just one shadow casting light, angling in from top-right or top-left, slightly to the front (daylight from a single
window will do, if not use a common light bulb - not the diffuse tube
light!). A white or very pale colored wall on the side opposite to the
light source, or a white sheet /curtain strategically hung, will
reflect a soft glow on the
shadow side of your target object(s), thus
bringing out the darker shadow zones between the
direct light and the
reflected glow. This will enhance the sense of dimension even more.
A common
incandescent light bulb, which is a 'point source' like direct sunlight, will cast
sharp shadows of an object on its neighbor(s). At the same time, the shape of that neighboring object will also affect the shape of the
cast shadow itself. Imagine/compare the shadow of a post on the flat ground, with that on a corrugated surface. In the first instance the shadow will be straight, while it'll be wavy in the latter. Noting this phenomenon will further co-relate one object in the present still-life assemblage to another, and also to the
ground on which it is placed. Obviously the ground will also receive a cast shadow, and if its covered in a piece of cloth that has folds/ripples in it, those will also affect the shape of the shadow.
N.B. We may later on (while painting) note the color of the shadow - its usually a
darker version of the local color of the object, on which it has formed. However, if there is a softer,
secondary light filling the shadows (e.g. the light from the blue sky on a sunny day, when the sun is the
primary light), the shadows will be bluish. This is especially seen on a white/pale object, which by itself minimally affects the color of the secondary illumination (think of the shadow side of a snowman under that blue sky). Here the sun can't illuminate places where shadows are formed, while the diffuse sky light, coming from all around, tints those shadows with blue.
Bottom line
-
have a simple still-life arrangement, with one point-source light,
angling down slightly from the front. Plus a pale reflecting surface on the
opposite side.
Have a look at this still life by
J B Chardin
(click to enlarge and study closely if you want to)... see how well
integrated each object is to one another with those reflections,
counter-reflections and shadows!
http://en.wikipedia.org/wiki/File:Jean-Baptiste_Sim%C3%A9on_Chardin_029.jpg
Another painter whose still lifes I like a lot -
Fantin Latour :
http://www.artcyclopedia.org/art/henri-fantin-latour-flowers.jpg
2) Value study - I think your still lives would further benefit from preliminary value studies. I'll explain;
After you've
drawn the shapes, do the following -
- Notice where the light is coming
from, and the direction in which it's casting shadows. There are also
shadows on the objects themselves (lets call these body shadows), apart from the cast
ones. Indicate lightly, say with a pencil, the areas which are in shadow
and which are in light. Some areas will have a diffuse transition zone
between lit and un-lit areas, depending on the shape of the object
(diffuse for round/cylindrical objects, sharp for boxes, which have corners). Indicate
accordingly with hatching marks.
Remember, this is only a kind of training, helping you to look for areas of different illumination in the scene. So don't go overboard with your hatching, unless you're doing a finished pencil drawing. Also,
disregard all reflected illumination at this point, even if you can see those.
This is a small sketch, approx 6" x 6", of a simple still life arrangement. At this stage, I've indicated the basic shapes, and how these are overlapping each other.
Here I've separated lit from unlit zones, and filled up or 'blocked' those shadow areas. Notice the shadow of the cup, cast on the lower corner of the mug. So,
once you've separated the shadows from the light, fill up those shadow
areas with a homogenous, middle-gray (use plain, diagonal hatching marks
to do this quickly, kind of like what I've done, if you ultimately intend to 'paint', rather than 'draw' this scene).
Since I had also intended to do a little
drawing demo, I went ahead and did a rough finish as you can see. Normally, I wouldn't have bothered to do all that shading, and directly gone on to the painting stage.
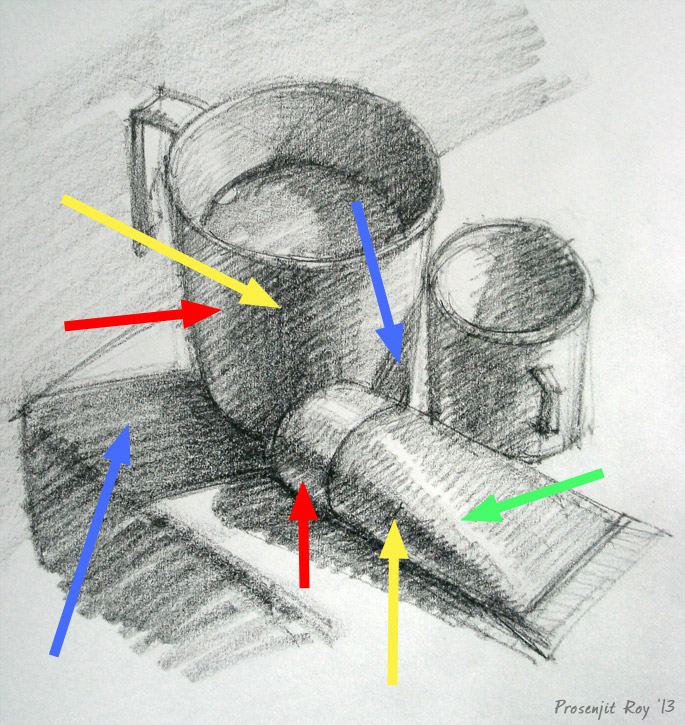
Here I've indicated, with colored arrows, the different shadow zones -
Red arrows -
reflected illumination or 'glow'; This is within the blocked-in shadow zone, being softly lit by light reflected from surrounding areas e.g. a nearby wall, curtain, floor. This area must
never be brighter than the directly lit areas.
Yellow arrows point to the darker shadow zone between the lit and the reflected glow areas. This is also known as the
Core Shadow area and are very important in giving that 'sense of turn' to the object. Beyond the core shadow area, the object gradually emerges into the lit zone, revealing its true local color.
Blue arrows -
cast shadow areas. Note that this is darkest closest to the object (e.g. the rim of the mug near the table-top, or immediately under the paint tube). Cast shadow areas are often lit up in the color of the secondary light, as explained in sections above. When using a single point-source light, cast shadows have sharp edges.
Green arrow - indicates the
highlight zone, which has the maximum concentration of light rays directly reaching the viewer's eyes (hence often appears burnt out, or 'white'). Depending on the shape of the object, the shape of the highlight may change (e.g. its linear on the side of a cylindrical/conical object, round on a spherical one). It will also vary according to the texture of the object's surface. Shiny objects
will have small, bright highlights. Rough objects will have dimmer,
wider highlights.
The middle tone - This is the lit area between the high light area, and the core shadow area (i.e., area between maximum light and maximum dark on the object concerned). It is to be painted with the
actual color of the object.
The painting stage and the
value study -
(I was using dry pastel for this demo, and taking pictures at successive stages. I continued to do that until I finished painting, but later on did a quick-ish digital painting on the pencil/charcoal stage of the picture, to better illustrate the value study. So the following two pics are digitally painted over the pencil base)
If you're painting with potentially opaque colors like acrylic or oil, you may take some Burnt Umber, dilute a little
with water/solvent, and fill up or block-in all those shadow areas. Remember, this is just a
middle-dark tone, not your darkest dark! So try not to paint opaquely. The value study is aimed at understanding the different values (i.e. degree of brightness or darkness) at different areas of the scene
After this, extend that burnt umber tone (previously
painted in the shadow zone) towards the lit area,
progressively lightening it with
water (or white paint, whatever is convenient), from the shadow zone upto
the highlight zone. As mentioned previously, this is the
middle tone of your picture - these
areas are not in shadow, but between the high light and the shadow areas,
and
they are most representative of the object's colors.
After
you've painted the middle tones, and thereby established the highlights
as well,
stand back, and look - ascertain which areas need the darkest
darks (i.e., those areas where no light is reaching, e.g. near the rim of the mug close to the table-top). Without
diluting your umber, paint those areas directly. You may add a little
prussian blue to the mix to darken further. Now you have a complete
value study of your scene.
I'd suggest, paint a few of these
value studies using simple still life objects - say a cup on a saucer,
placed on a white cloth. The value study may also serve as an
Underpainting, over which you may continue to add progressively opaque layers of color, with the underpainting guiding you on the local value.
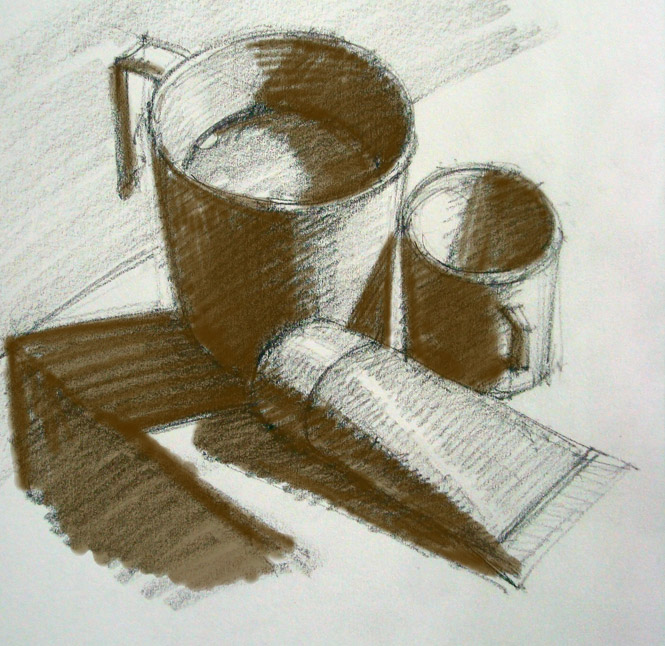
So I continued to paint with dry pastel from pic 3 onwards...
I've used a burnt umber shade to do the initial block-in. Then I've painted the
middle tone areas with a few broad strokes, just to indicate to myself the actual color of the objects. Note the sample color patches at the bottom left, representing the colors of the mug, cup, tube and table-top. I'll later choose some other color for the background. This whole thing served as my pastel underpainting.
.
I continued to add color on top of this 'underpainting' - remember,
a color in shadow is not black, its just
a darker version of that same color.
The opposite is true for that color in the highlight zone, i.e. it is a lighter version of that same color. If you're
painting objects with surface patterns, textures etc, (e.g. apples, which has linear streaks)... paint the dominant color
first. Say, a shade of red. Paint it out entirely in that color,
modifying its values according to the shadow scheme. You may paint the
texture streaks later on, while finishing up.
Here I'll repeat what I've already said during the value study (digital) demo -
After
you've painted the middle tones, and thereby established the highlights
as well,
stand back, and look - ascertain which areas need the darkest
darks (i.e., those areas where very little light is reaching, e.g. near the bottom of the paint tube). Without
diluting your umber, paint those areas directly. You may add a little
prussian blue to the mix to darken further.
Now is the time to
paint
reflected glows on the shadow side. Always remember - these
indirectly lit areas MUST NEVER be brighter than areas which are
directly lit. Most often, they take on the color of the neighboring
object light is being reflected from - so, if there's a green fruit
near a red apple, the reflected glow will have a green tinge on that
apple's shadow area. Also, a matt surface will reflect
less light (and thereby color) than a shiny surface, so all objects may not be similarly lit/colored by reflected glow.
The finished study, 6" x 6", pastel on paper. Took me about 1-1.15 hrs (excluding the digitals, of course).
Arrows pointing to reflected light/color on objects on their shadow side. The paint tube is reflecting color from the blue table-top, the yellow cup is reflecting color from the reddish tube itself.
Lastly (but hardly the least!), take care of
the edges... which are
nothing but areas on an object that is turning out of the viewer's
eyesight. The object is not ending, cut-out like, in that area. So,
there must be that
sense of turn to the edge. Usually, edges
take on color from neighboring areas. Say, a bald man's head, who is
standing under a blue sky, will have a bluish tinge near the edge.
The best advice is probably to observe carefully, and then
paint what we see. The more we paint draw, the more nature will reveal its wonders to us! Thanks for reading :)